There are tons of cool projects like this, do let me know if you make this hat...we want a picture!
Here is a smart stitched hat that you may make of any silk or wool fabric. It is interlined with either crinoline or heavy muslin. You will need three-quarters of a yard of the hat material, and the same amount of interlining. You will also need a hat lining and one yard of three-quarter inch wide grosgrain ribbon for the trimming.
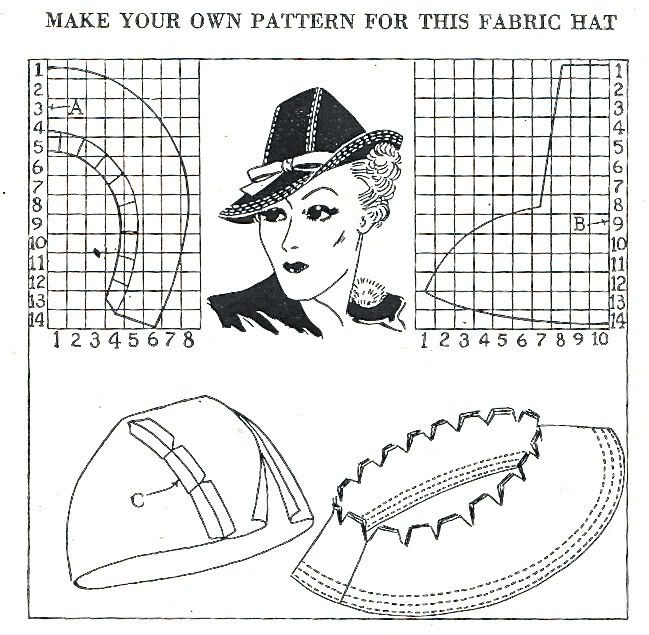
For the brim pattern cut a piece of paper 8 inches wide and 14 inches deep. Rule this paper into one-inch squares, as shown at the upper left, and then outline the brim pattern so that the lines cross the ruled squares just as they do here in the diagram. The edge of the pattern marked A is placed on a fold of the goods in cutting the fabric. Use the pattern to cut the top and 'bottom of the brim and also the interlining.
To make the crown pattern, cut a piece of paper 10 inches wide and 14 inches deep and rule it in one-inch squares, as at the upper right. Outline the pattern over the squares, as in the diagram. The edge of the pattern marked B is placed on a fold of the goods in cutting both the crown and the interlining.
Baste the seams of the crown and try it on to adjust the size, then stitch the seams, clip the edges and press them open, as shown here at C. Turn to the right side and make the two decorative rows of stitching along the seam lines. Make the crown interlining of the stiff material.
Baste, try on and then stitch the center back joinings in the two brim pieces and the brim interlining. Place the two layers of the hat material with right sides together and then place the interlining on top. Baste and stitch around the outside edge, then turn right side out, baste along the turned edge and then finish it with three rows of stitching, as shown.


I may just have to give this one a go! Thanks!
ReplyDeleteCool post. Thanks!
ReplyDeletethis looks cool and I want to try it. Do you have any other hat patterns to put up?
ReplyDeleteThere is this one...not as dashing, but since a hat is as good as the wearers attitude, you could try it. Look for the Shell Oil patterns, the folded hat was posted Nov 17, 09. (For some reason I couldn't put the link here)
ReplyDelete