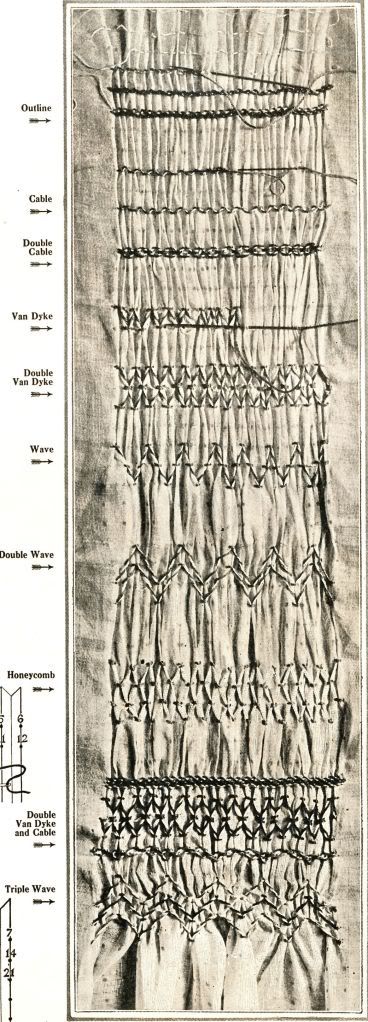
In the early days when a peasant's blouse was not a fitted garment and there were sections that required gathering, in order to make them fit, smocking as a means of gathering the excess fabric came into being, and many were the variations that were introduced. Many of the simpler stitches are illustrated here.
The best aid in smocking is the row upon row of carefully and evenly placed dots, obtained most easily by using a stamping pattern. Usually two and a half times the width of the material (when finished) is required before stamping. You can he assured of more even and beautiful smocking if the gathering is done before the smocking is begun, and the width desired when finished determined and regulated by the gathering threads.
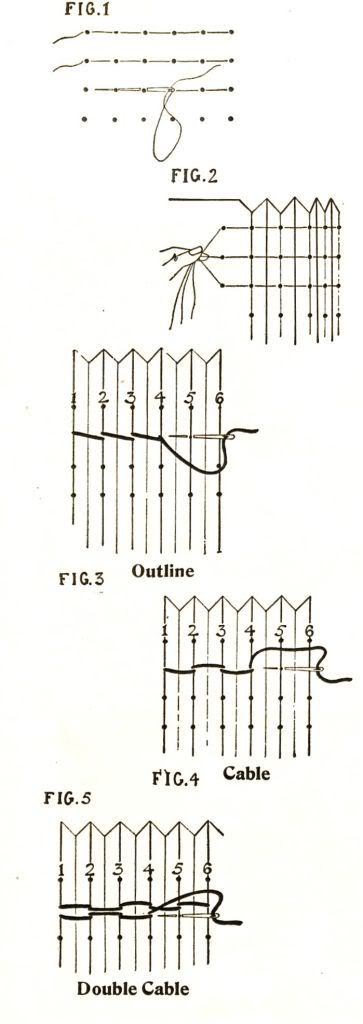
Fig. 1 shows the method of gathering the dots under the needle, and Fig. 2 shows how the material when gathered makes the plaits along the row of dots, which enables you to quickly take up the three or four threads of the fabric. Compress your materials into plaits so that the width of the plaited material is the width you wish for the finished smocking.
Outline Stitch (Illustration No. 3)
The outline stitch is worked on one line of horizontal dots. Begin at the left. Bring the needle up between dots 1 and 2. Pick up dot No. 1, keeping the thread below the needle. Pick tip dot No. 2 and draw slightly together. Continue by taking up dot No. 3, drawing together, then take dot No. 4 and continue, always keeping the thread below the needle.
Cable Stitch (Illustration No. 4)
The cable stitch is worked in the same manner as the outline stitch except that the thread in the first stitch is held under the needle and in the second stitch the thread is above the needle. The third is under the needle and the fourth above, continuing in alternating stitches.
Double Cable Stitch (Illustration No. 5)
The double cable stitch can be worked on one row of dots, keeping the second row of stitches close to the first row, using the same row of dots. If the top or first row is begun with a stitch with the thread held under the needle, the second row of stitches is begun with the thread held over the needle, alternating to the end.
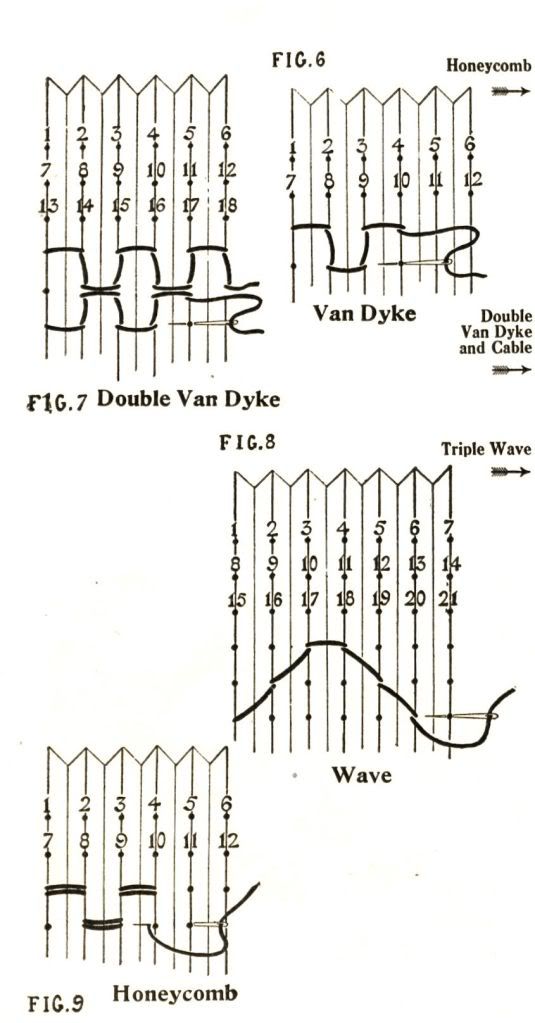
Van Dyke Stitch (Illustration No. 6)
Starting at the left, bring needle up to the right of dot No. 1, take a stitch with the thread above the needle, through dot or plait No. 1. With the thread above the needle, take stitch through dot No. 2 from right to left. With the thread still above the needle, take stitch through dot No. 9. With the thread below the needle, take stitch through dot No. 10. With the thread below the needle, take stitch through dot No. 3. With the thread above the needle, take stitch through dot No. 4. Repeat until end.
Double Van Dyke (Illustration No. 7)
The first row is made the same as the single Van Dyke. The second row begins at dot No. 13, taking a stitch with the thread below the needle. With the thread still below the needle, it goes to dot No. 14. With the thread below the needle, to No. 8. With the thread above the needle, to No. 9, keeping the stitch under the previous row. With the thread above the needle, to No. 15 . With the thread below the needle, to No. 16, and with the thread below the needle, to No. 10, and with the thread above the needle, to No. 11.
Wave Stitch (Illustration No. 8)
Beginning at the left, bring the needle tip to the right of dot No. 15. Take a stitch through dot No. 13 with the thread under the needle. With the thread under the needle, take a stitch through dot No. 9. With the thread under the needle, take a stitch through dot No. 3. With the thread over the needle, take a stitch through dot No. 4. With the thread over the needle, take a stitch through dot No. 12, and with the thread over the needle, to dot No. 20. With the thread under the needle, continue to dot 21. If any of the dots are visible after smocking, remove with gasoline.
Honeycomb Stitch (Illustration No. 9)
Bring thread up through dot No. 1. Stitch No. 1 and 2 together with the thread over the needle. Draw needle through dot No. 2 again, and out through No. 8. Draw 8 and 9 together with thread tinder the needle. Bring through dot No. 9 up to 3, and stitch 3 and 4 together with the thread above the needle. Repeat.


No comments:
Post a Comment